
Guides
Change the pose, keep the character: start with two reference roles
Plan a seated pose for the same character using Gia's original pose references. Choose the action and viewpoint, assign image roles and check identity drift.
Ethan Wang
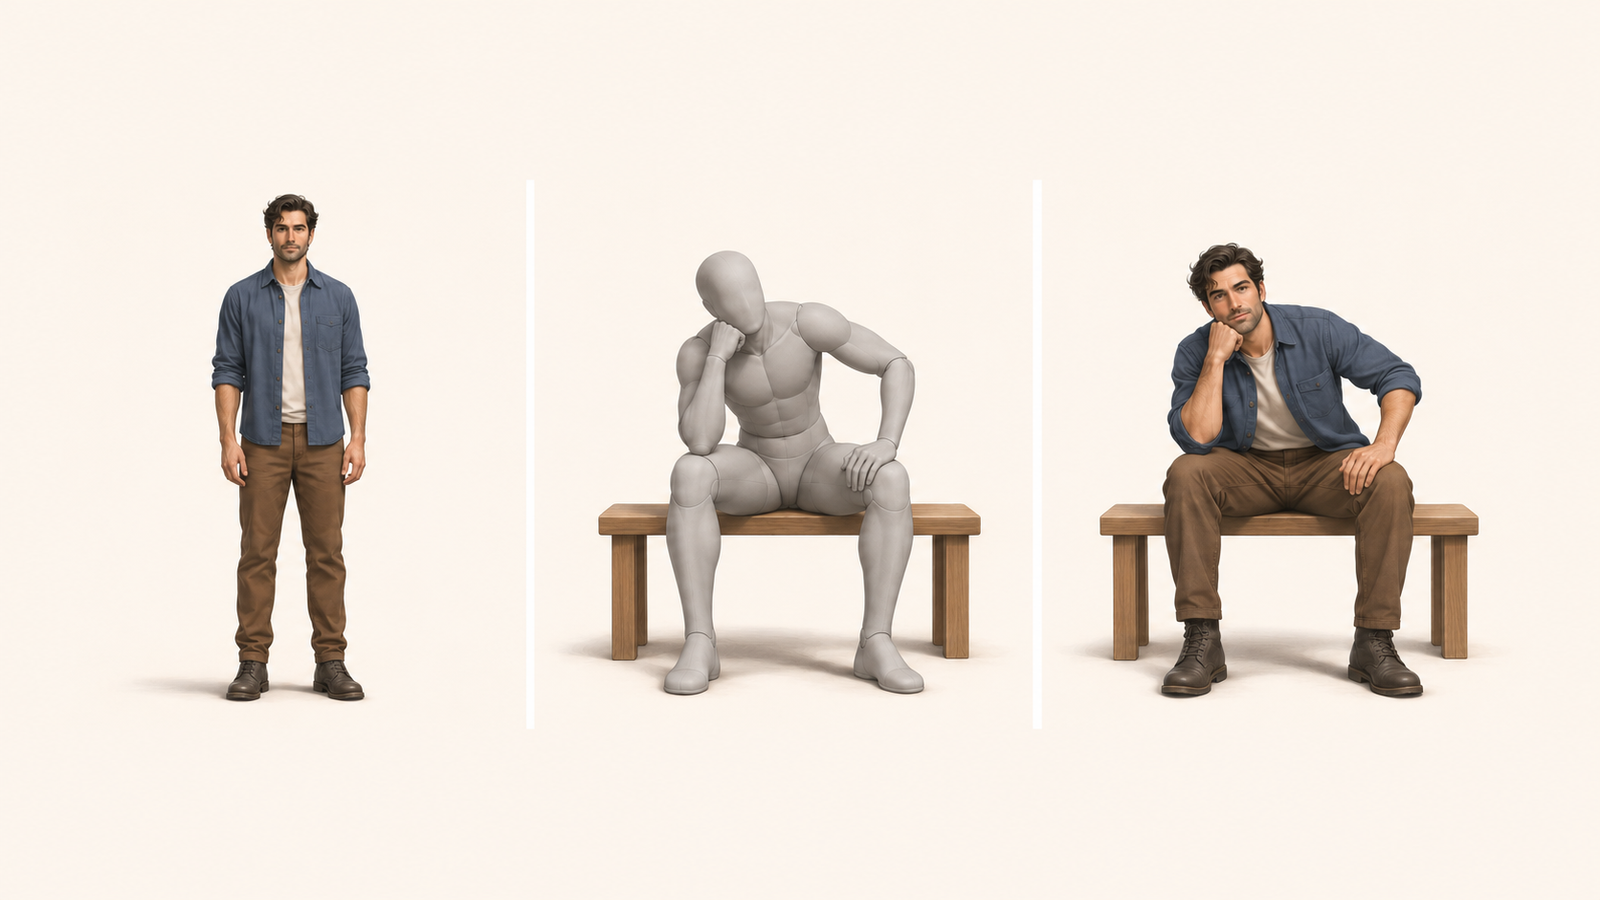
You like the character's face and clothes; the next image only needs a seated pose with a hand under the chin. The character image defines who to keep, while the pose image describes body placement and viewpoint. Start with Gia's original gallery, then turn those choices into an editing instruction.
Creator and project links
Original resource: POSE-DB-01, published by ギア (@giaaibusi). See the creator's announcement.
Character: keep identity and clothing · Pose: specify body placement · Target composition: combine the roles — Conceptual roles: character, pose and intended composition. Generated as one illustration with the built-in image tool, not an APIXO before-and-after test.
See how the creator presents this collection
Start with Gia's original announcement, then adapt the references to your own project.
ギア · @giaaibusi
https://x.com/giaaibusi/status/2114916230226391550If the post does not load, open it on X.
Start with the original pose gallery
Open Gia's POSE-DB-01 and look for candidates by pose name, ID or category. Compare viewpoints of the same action. Its faceless gray mannequin line drawings describe body placement and composition; your character's identity, clothing and style come from a separate reference.
For a seated chin-rest pose, make three decisions first
1. Choose the action and check support points
Look for a seated pose, then check the seat, feet and elbow support. Choose an image that makes those relationships visible instead of relying on its name alone.
2. Compare viewpoints of the same pose
Compare front, high, low, side and oblique views. If the head hides the hand, change the viewpoint before adding more instructions; keep the face, hand and knee relationship readable.
3. Prepare separate character and pose references
Select the reference you need individually and follow the source site's terms. Use your own adult fictional character for identity and the pose image for action and viewpoint. Add an outfit reference only if the clothing must change too. Selecting a reference and editing an image are separate steps.
Give each image a clear job in the instruction
Image 1 is an adult original fictional character. Use image 2 only for the seated, chin-on-hand body arrangement and camera view. Keep image 1’s face, hair, blue jacket and drawing style. Place the elbow on the knee with the hand supporting the chin. Adjust framing as needed for the seated pose. Do not copy the gray mannequin appearance or line-art texture.
After an APIXO edit, check three things
First compare the head, elbow and leg arrangement. Then check for changes to identity and clothing. Finally inspect fingers, joints and contact points. Addressing one mismatch at a time makes the next edit easier to specify.
Wrong pose or a different face: what to adjust next
For a pose mismatch, compare elbow support, head direction and foot contact together with the camera angle. If the reference hides those relationships, try another view before adding a precise action instruction. For identity or clothing drift, return to the original character image, assign it identity and clothing, and temporarily remove extra outfit references. Large framing changes also need a model check: Qwen follows the first image’s composition and dimensions.
Expand one action into several storyboard viewpoints
Choose one action, such as sitting with a hand under the chin, and compare front, side and oblique references. Generate a complete character image for each viewpoint, retaining clothing, seat position and light direction. A front view establishes the character; a side view clarifies support; a tighter composition emphasizes expression. These are shot choices, not automatically successive moments of an action. Compare gaze, body orientation and scene axis before using the images as comic panels, a storyboard or a video shot list.
Plan a readable movement with starting and ending poses
Choose a small change first: looking down and then raising the head while seated, rather than jumping from standing to falling. Prepare two finished character images with matching framing, clothing and background, then assign them as start and end in a compatible mode. For example: “Remain seated, slowly raise the head toward the camera, keep the elbow supported on the knee, camera locked.” Inspect the arm's path, balance and contact points between the endpoints; similar endpoints do not ensure a correct transition. You can also explore head turns, raised hands or slight body turns from a single starting image, solving one action before assembling shots.
Video models: Kling 2.6 · Seedance 2.5
Where to take the idea next
To combine clothing, poses and spatial layout, continue with the multi-gallery workflow from character references to video storyboards.
Before you begin
These scenes and instructions are creative plans, not APIXO generation tests. Use your own adult fictional character and select individual references under the original gallery's terms; do not bulk-download or redistribute gallery images. Check the selected model's input mode and current cost.
Official sites and sources
Finish one character image first, then choose the video input mode.
Build with APIXO
Explore image, video, and audio models in one place.