> ## Documentation Index
> Fetch the complete documentation index at: https://apixo.ai/docs/llms.txt
> Use this file to discover all available pages before exploring further.
# Install APIXO MCP
> Connect APIXO MCP to Cursor, Claude Code, Codex, or any MCP client
This guide walks you through installing the `@apixo/mcp-server` package and connecting it to your AI coding tool on Windows, macOS, or Linux. The instructions below cover Cursor, Claude Code, and Codex CLI in detail, plus a generic config that works for any other MCP client.
## Prerequisites
* Node.js `>= 20` and npm `>= 9` (the server runs via `npx`)
* An APIXO API key from [Dashboard -> API Keys](https://apixo.ai/dashboard/api-keys)
* One MCP-compatible client, for example:
* [Cursor](https://www.cursor.com)
* [Claude Code](https://docs.claude.com/en/docs/agents-and-tools/claude-code/overview)
* [Codex CLI](https://github.com/openai/codex)
* [Claude Desktop](https://claude.ai/download), [Windsurf](https://windsurf.com), [Cline](https://cline.bot), [Continue](https://continue.dev), [Zed](https://zed.dev), or any other client that supports stdio MCP servers
The server is published to npm as `@apixo/mcp-server`. `npx -y @apixo/mcp-server` always pulls the latest release, so you do not need to reinstall when we update it.
## Step 1: Set your API key
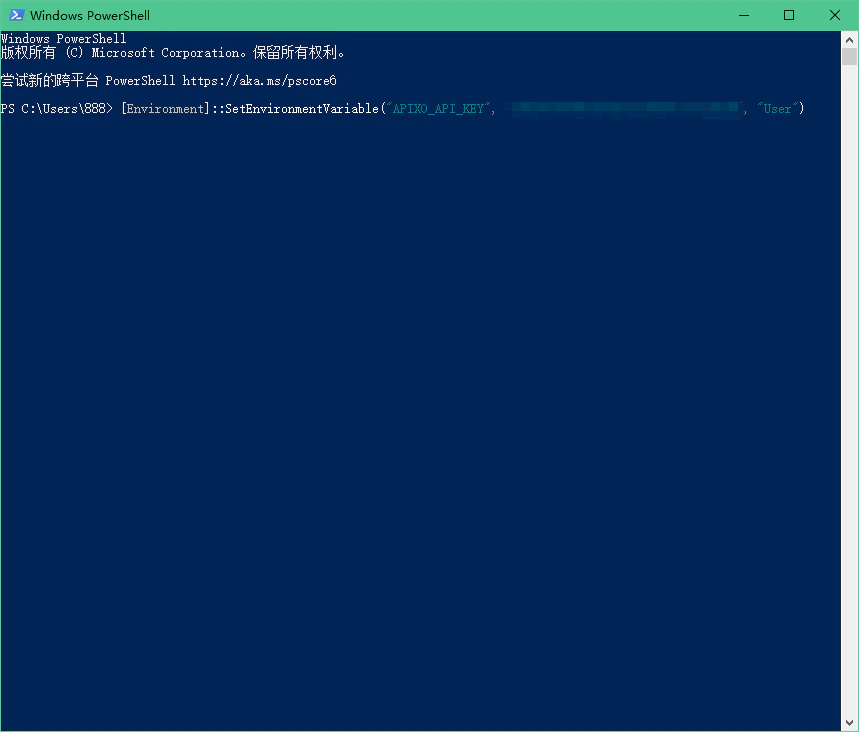
Export `APIXO_API_KEY` as a persistent environment variable so the MCP server can pick it up on every launch.
```powershell theme={null}
[Environment]::SetEnvironmentVariable("APIXO_API_KEY", "your_real_key", "User")
```
After running this, **close and reopen** PowerShell (or your terminal) so the new variable is loaded.
 ```bash theme={null}
echo 'export APIXO_API_KEY="your_real_key"' >> ~/.zshrc
source ~/.zshrc
```
```bash theme={null}
echo 'export APIXO_API_KEY="your_real_key"' >> ~/.bashrc
source ~/.bashrc
```
You can also set `APIXO_API_KEY` only inside the MCP client config (see Step 2). Setting it as a user-level environment variable is recommended because it works for all clients on the machine.
## Step 2: Register the MCP server
Open or create `~/.cursor/mcp.json` (Windows: `%USERPROFILE%\.cursor\mcp.json`) and add an entry under `mcpServers`:
```json theme={null}
{
"mcpServers": {
"apixo": {
"command": "npx",
"args": ["-y", "@apixo/mcp-server"],
"env": {
"APIXO_API_KEY": "your_real_key"
}
}
}
}
```
The `env.APIXO_API_KEY` field is optional if you already set the variable in Step 1, but adding it here makes the config self-contained.
Then open Cursor's MCP settings panel and confirm that `apixo` is listed and reports a healthy status.
Run `claude mcp add` from any terminal. The trailing `--` separates the wrapper command from the MCP server command:
```bash theme={null}
claude mcp add --env APIXO_API_KEY=your_real_key apixo -- npx -y @apixo/mcp-server
```
By default this registers the server at **user** scope (stored in `~/.claude/`, available across all projects). Other scope flags:
* `--scope project` writes to a committable `.mcp.json` in the current repo, so your teammates pick it up automatically.
* `--scope local` keeps it per-user per-project (`.claude/*.local.*`).
If you already set `APIXO_API_KEY` as a system environment variable in Step 1, you can drop the `--env` flag.
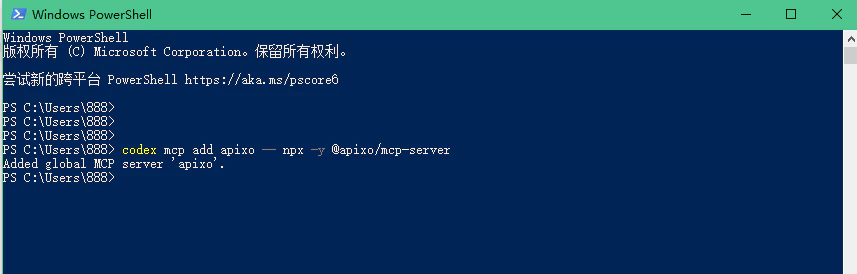
Run the `codex mcp add` command in any terminal:
```bash theme={null}
codex mcp add apixo -- npx -y @apixo/mcp-server
```
You should see something like `Added global MCP server 'apixo'.`
```bash theme={null}
echo 'export APIXO_API_KEY="your_real_key"' >> ~/.zshrc
source ~/.zshrc
```
```bash theme={null}
echo 'export APIXO_API_KEY="your_real_key"' >> ~/.bashrc
source ~/.bashrc
```
You can also set `APIXO_API_KEY` only inside the MCP client config (see Step 2). Setting it as a user-level environment variable is recommended because it works for all clients on the machine.
## Step 2: Register the MCP server
Open or create `~/.cursor/mcp.json` (Windows: `%USERPROFILE%\.cursor\mcp.json`) and add an entry under `mcpServers`:
```json theme={null}
{
"mcpServers": {
"apixo": {
"command": "npx",
"args": ["-y", "@apixo/mcp-server"],
"env": {
"APIXO_API_KEY": "your_real_key"
}
}
}
}
```
The `env.APIXO_API_KEY` field is optional if you already set the variable in Step 1, but adding it here makes the config self-contained.
Then open Cursor's MCP settings panel and confirm that `apixo` is listed and reports a healthy status.
Run `claude mcp add` from any terminal. The trailing `--` separates the wrapper command from the MCP server command:
```bash theme={null}
claude mcp add --env APIXO_API_KEY=your_real_key apixo -- npx -y @apixo/mcp-server
```
By default this registers the server at **user** scope (stored in `~/.claude/`, available across all projects). Other scope flags:
* `--scope project` writes to a committable `.mcp.json` in the current repo, so your teammates pick it up automatically.
* `--scope local` keeps it per-user per-project (`.claude/*.local.*`).
If you already set `APIXO_API_KEY` as a system environment variable in Step 1, you can drop the `--env` flag.
Run the `codex mcp add` command in any terminal:
```bash theme={null}
codex mcp add apixo -- npx -y @apixo/mcp-server
```
You should see something like `Added global MCP server 'apixo'.`
 If the `codex` command is not recognized, see [Troubleshooting -> CLI not found on PATH](/integrations/mcp/troubleshooting#cli-not-found-on-path).
Most MCP clients (Claude Desktop, Windsurf, Cline, Continue, Zed, …) load stdio servers from a JSON config that uses the same shape. Add an `apixo` entry under whichever `mcpServers` block your client expects:
```json theme={null}
{
"mcpServers": {
"apixo": {
"command": "npx",
"args": ["-y", "@apixo/mcp-server"],
"env": {
"APIXO_API_KEY": "your_real_key"
}
}
}
}
```
Common config file locations:
| Client | Config file |
| ------------------------ | ----------------------------------------------------------------- |
| Claude Desktop (macOS) | `~/Library/Application Support/Claude/claude_desktop_config.json` |
| Claude Desktop (Windows) | `%APPDATA%\Claude\claude_desktop_config.json` |
| Windsurf | `~/.codeium/windsurf/mcp_config.json` |
| Cline / Continue / Zed | Configured from each tool's MCP settings UI |
Refer to your client's docs if a different file path applies; the JSON shape above is the standard MCP server descriptor and will work as long as the client supports stdio servers.
## Step 3: Verify the registration
A healthy install exposes five tools under the `apixo` server:
* `apixo_list_models`
* `apixo_get_model_schema`
* `apixo_generate_task`
* `apixo_get_task_status`
* `apixo_get_balance`
How you confirm this depends on the client:
Reload Cursor (or restart it) and open the MCP / Tools panel. The `apixo` server should report a healthy status and list the five tools above.
List and inspect from the terminal:
```bash theme={null}
claude mcp list
claude mcp get apixo
```
Or, inside a Claude Code chat session, run the slash command:
```text theme={null}
/mcp
```
It shows every connected MCP server and the tools it exposes. You should see `apixo` and its five tools.
```bash theme={null}
codex mcp get apixo
```
A healthy install prints `command: npx` and `args: -y @apixo/mcp-server`.
If the `codex` command is not recognized, see [Troubleshooting -> CLI not found on PATH](/integrations/mcp/troubleshooting#cli-not-found-on-path).
Most MCP clients (Claude Desktop, Windsurf, Cline, Continue, Zed, …) load stdio servers from a JSON config that uses the same shape. Add an `apixo` entry under whichever `mcpServers` block your client expects:
```json theme={null}
{
"mcpServers": {
"apixo": {
"command": "npx",
"args": ["-y", "@apixo/mcp-server"],
"env": {
"APIXO_API_KEY": "your_real_key"
}
}
}
}
```
Common config file locations:
| Client | Config file |
| ------------------------ | ----------------------------------------------------------------- |
| Claude Desktop (macOS) | `~/Library/Application Support/Claude/claude_desktop_config.json` |
| Claude Desktop (Windows) | `%APPDATA%\Claude\claude_desktop_config.json` |
| Windsurf | `~/.codeium/windsurf/mcp_config.json` |
| Cline / Continue / Zed | Configured from each tool's MCP settings UI |
Refer to your client's docs if a different file path applies; the JSON shape above is the standard MCP server descriptor and will work as long as the client supports stdio servers.
## Step 3: Verify the registration
A healthy install exposes five tools under the `apixo` server:
* `apixo_list_models`
* `apixo_get_model_schema`
* `apixo_generate_task`
* `apixo_get_task_status`
* `apixo_get_balance`
How you confirm this depends on the client:
Reload Cursor (or restart it) and open the MCP / Tools panel. The `apixo` server should report a healthy status and list the five tools above.
List and inspect from the terminal:
```bash theme={null}
claude mcp list
claude mcp get apixo
```
Or, inside a Claude Code chat session, run the slash command:
```text theme={null}
/mcp
```
It shows every connected MCP server and the tools it exposes. You should see `apixo` and its five tools.
```bash theme={null}
codex mcp get apixo
```
A healthy install prints `command: npx` and `args: -y @apixo/mcp-server`.
 You can also list every registered server with:
```bash theme={null}
codex mcp list
```
Open your client's MCP / Tools settings panel — most clients show connected servers and their tool lists there. You should see `apixo` and the five tools above.
If your client supports an MCP inspector or `/mcp` slash command, use that to confirm the server is connected and the tools are loaded.
If the server is registered but no tools appear, see [Troubleshooting -> No tools listed](/integrations/mcp/troubleshooting#no-tools-listed).
## Step 4: Try it from your agent
Fully restart your client (Cursor, Claude Code, Codex, or whichever one you set up) so the MCP server is launched, then run the prompts below. Each one constrains the agent to the `apixo` tools so you can confirm wiring without other tools interfering.
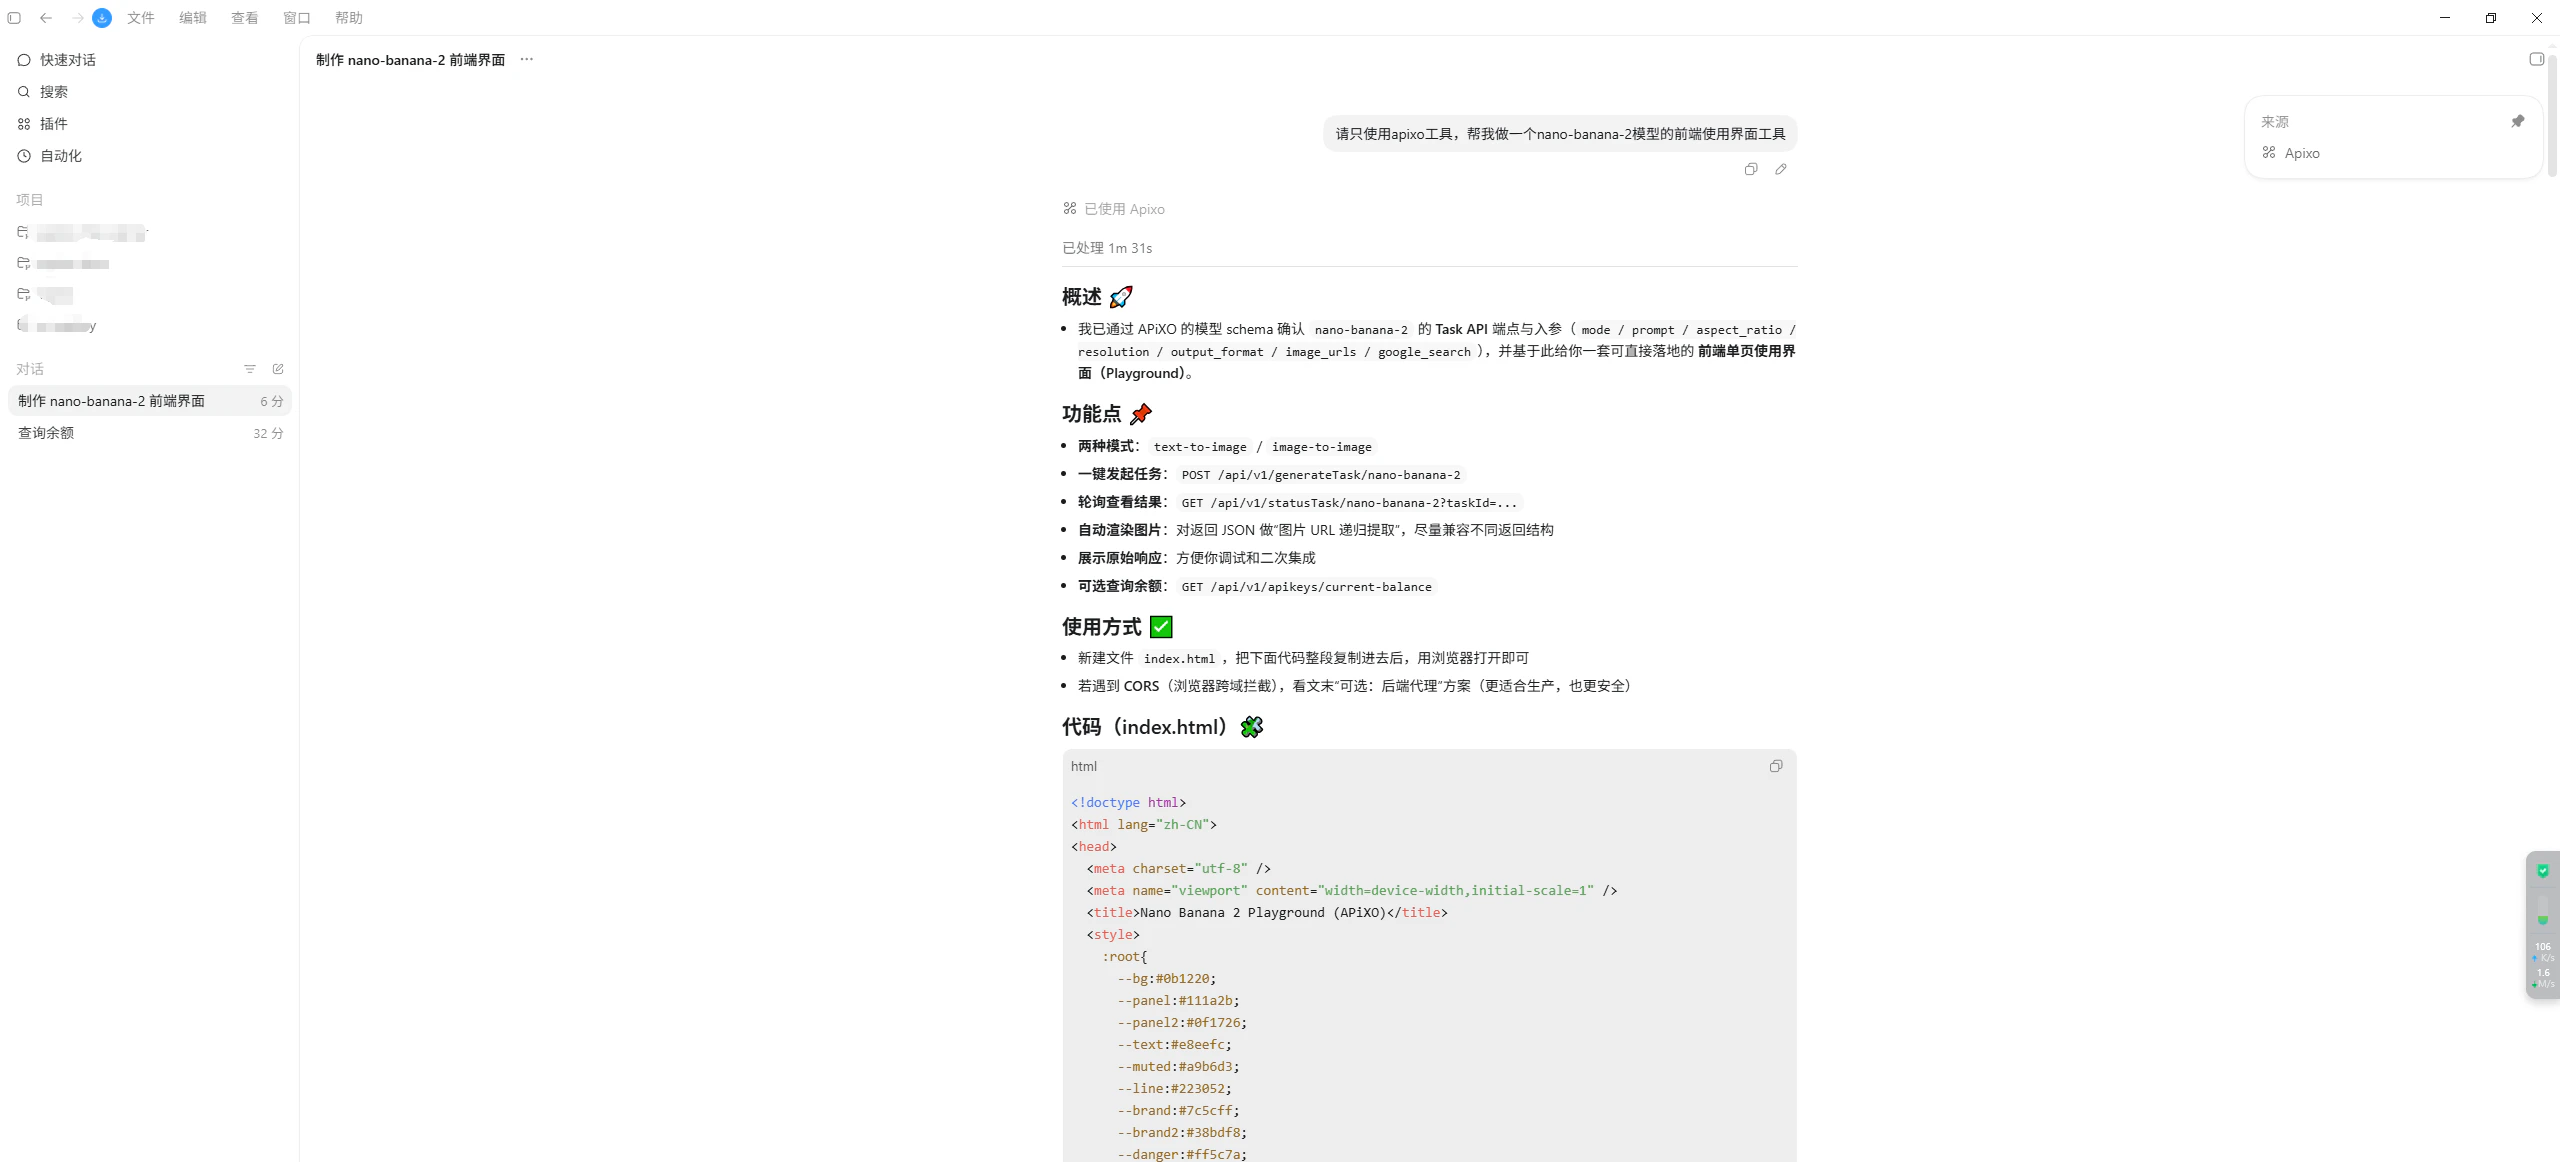
### Test 1: Scaffold integration code (recommended)
This is the primary use case — let the agent write APIXO calls into a small project.
```text theme={null}
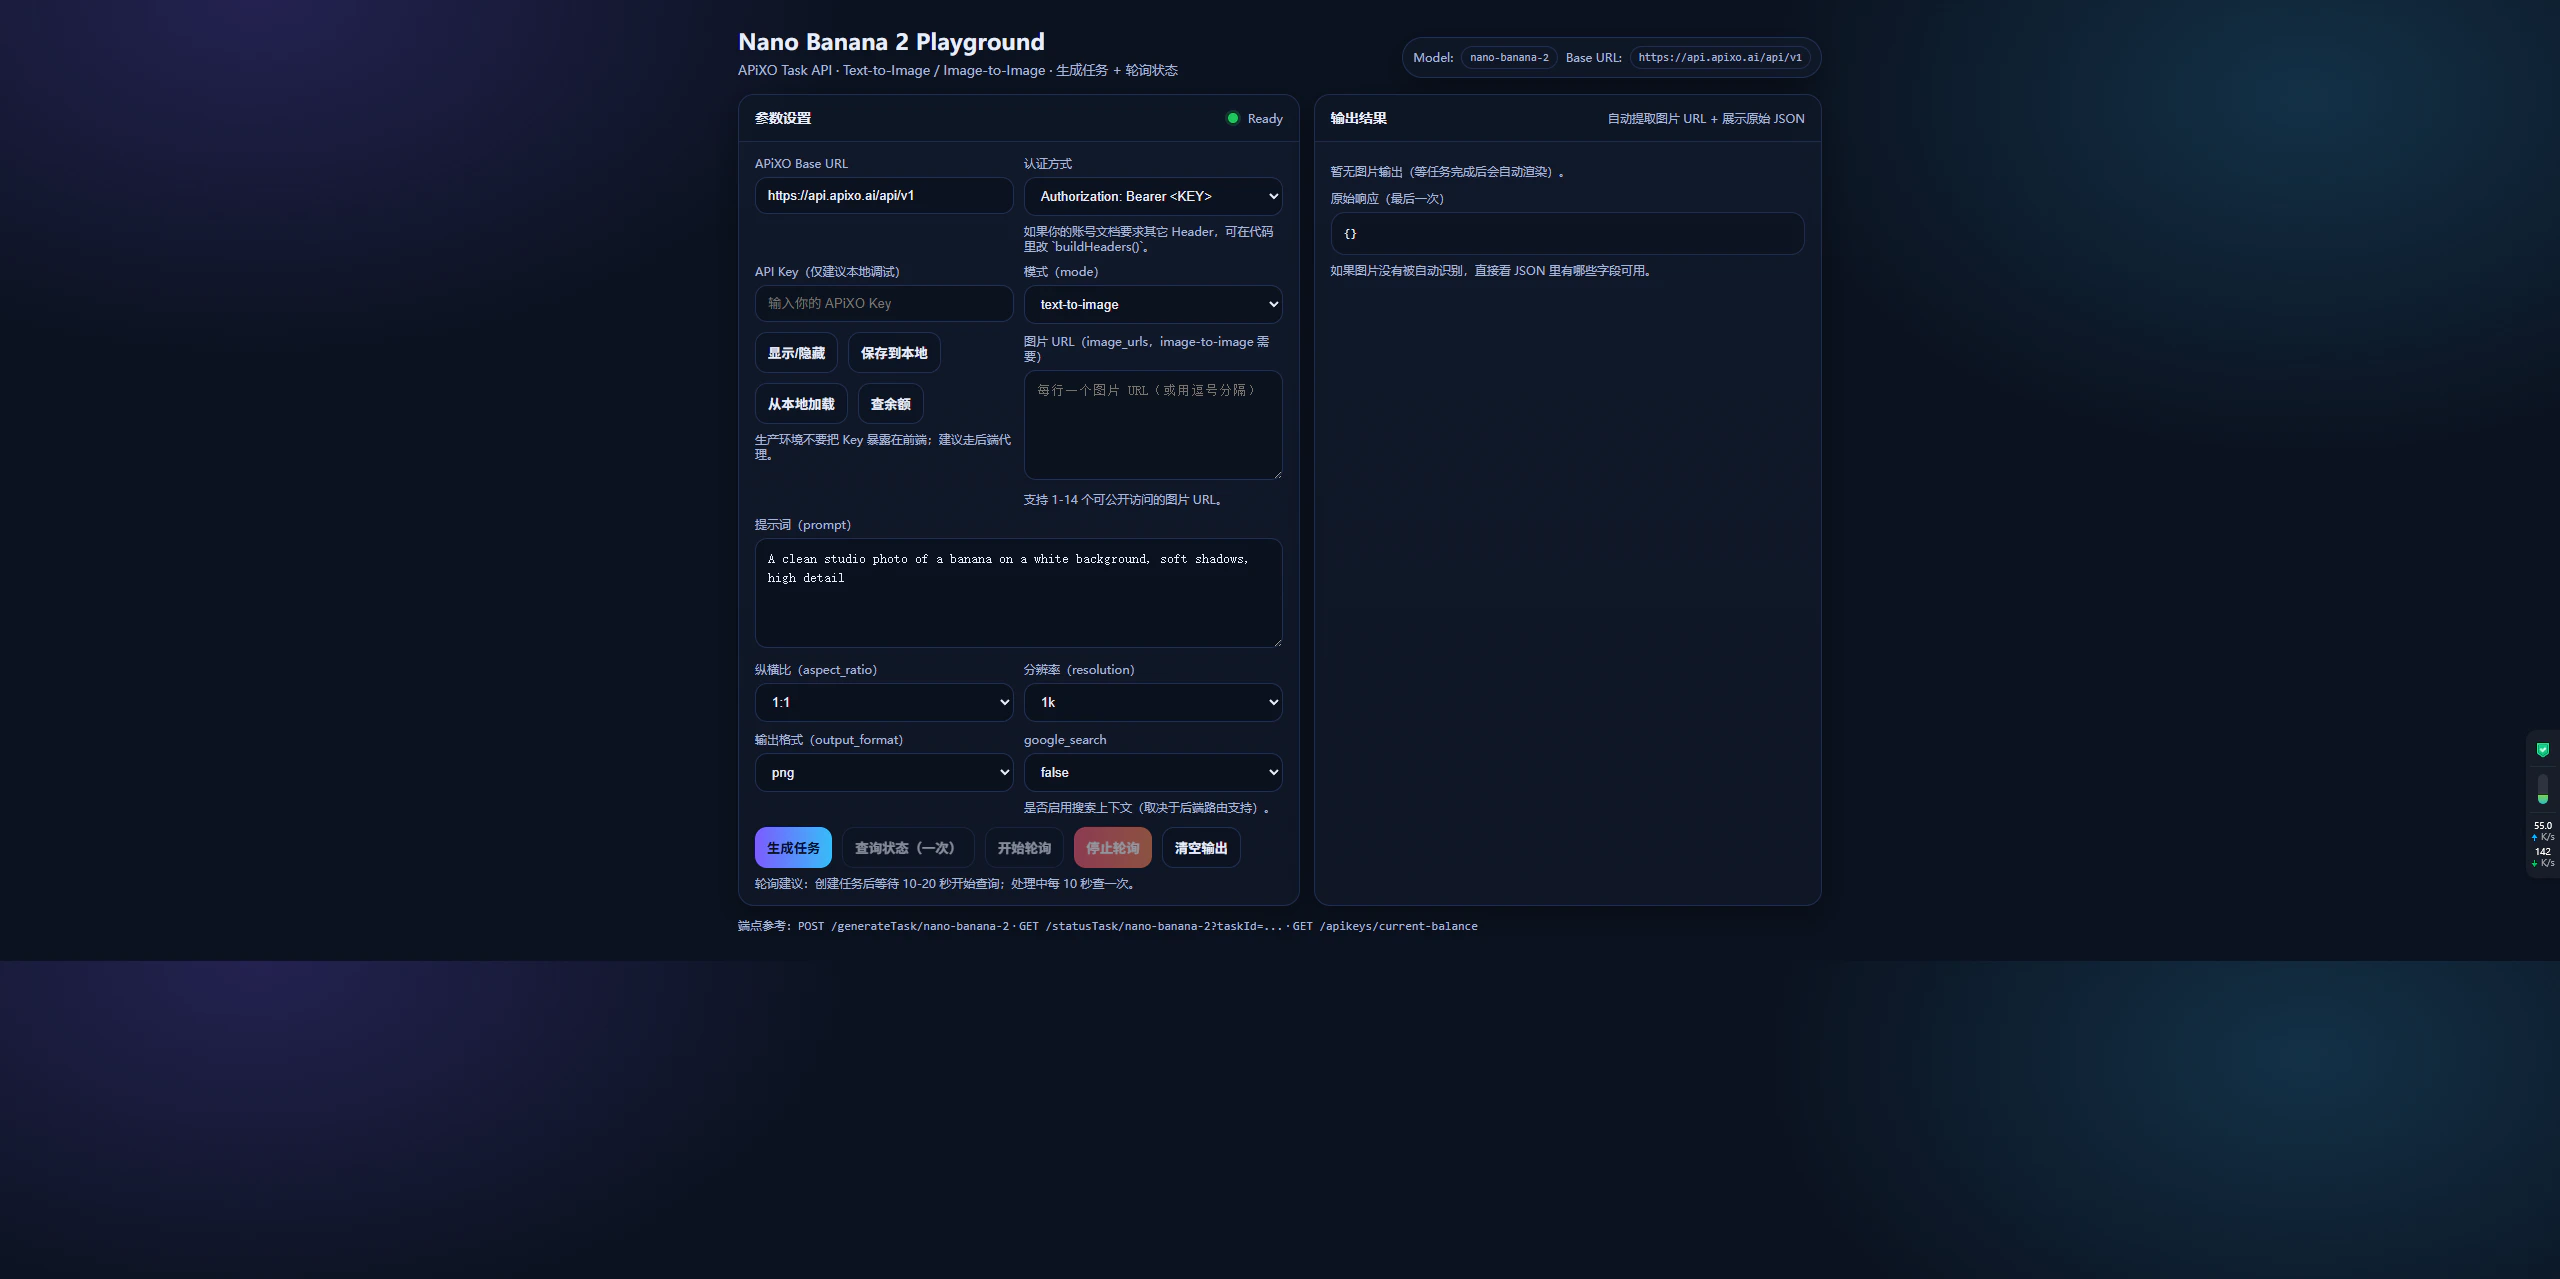
Use only the apixo MCP tools. Build a minimal HTML + JavaScript playground that
calls the nano-banana-2 model through the APIXO API. Look up the model's
parameters yourself, then give me the full code I can run locally.
```
Expected: the agent calls `apixo_list_models` and `apixo_get_model_schema` to discover `nano-banana-2`'s parameters, then writes working code against `https://api.apixo.ai/api/v1/generateTask/nano-banana-2`.
You can also list every registered server with:
```bash theme={null}
codex mcp list
```
Open your client's MCP / Tools settings panel — most clients show connected servers and their tool lists there. You should see `apixo` and the five tools above.
If your client supports an MCP inspector or `/mcp` slash command, use that to confirm the server is connected and the tools are loaded.
If the server is registered but no tools appear, see [Troubleshooting -> No tools listed](/integrations/mcp/troubleshooting#no-tools-listed).
## Step 4: Try it from your agent
Fully restart your client (Cursor, Claude Code, Codex, or whichever one you set up) so the MCP server is launched, then run the prompts below. Each one constrains the agent to the `apixo` tools so you can confirm wiring without other tools interfering.
### Test 1: Scaffold integration code (recommended)
This is the primary use case — let the agent write APIXO calls into a small project.
```text theme={null}
Use only the apixo MCP tools. Build a minimal HTML + JavaScript playground that
calls the nano-banana-2 model through the APIXO API. Look up the model's
parameters yourself, then give me the full code I can run locally.
```
Expected: the agent calls `apixo_list_models` and `apixo_get_model_schema` to discover `nano-banana-2`'s parameters, then writes working code against `https://api.apixo.ai/api/v1/generateTask/nano-banana-2`.
 ### Test 2: Submit a task directly from chat
Useful when you want to sanity-check a model before wiring it into code.
```text theme={null}
Use only the apixo MCP tools. Generate a 16:9 image with the nano-banana-2 model
of a serene Japanese garden at golden hour. Return the final image URL when done.
```
Expected: the agent calls `apixo_generate_task` for `nano-banana-2`, polls with `apixo_get_task_status` until the task succeeds, and prints the result URL.
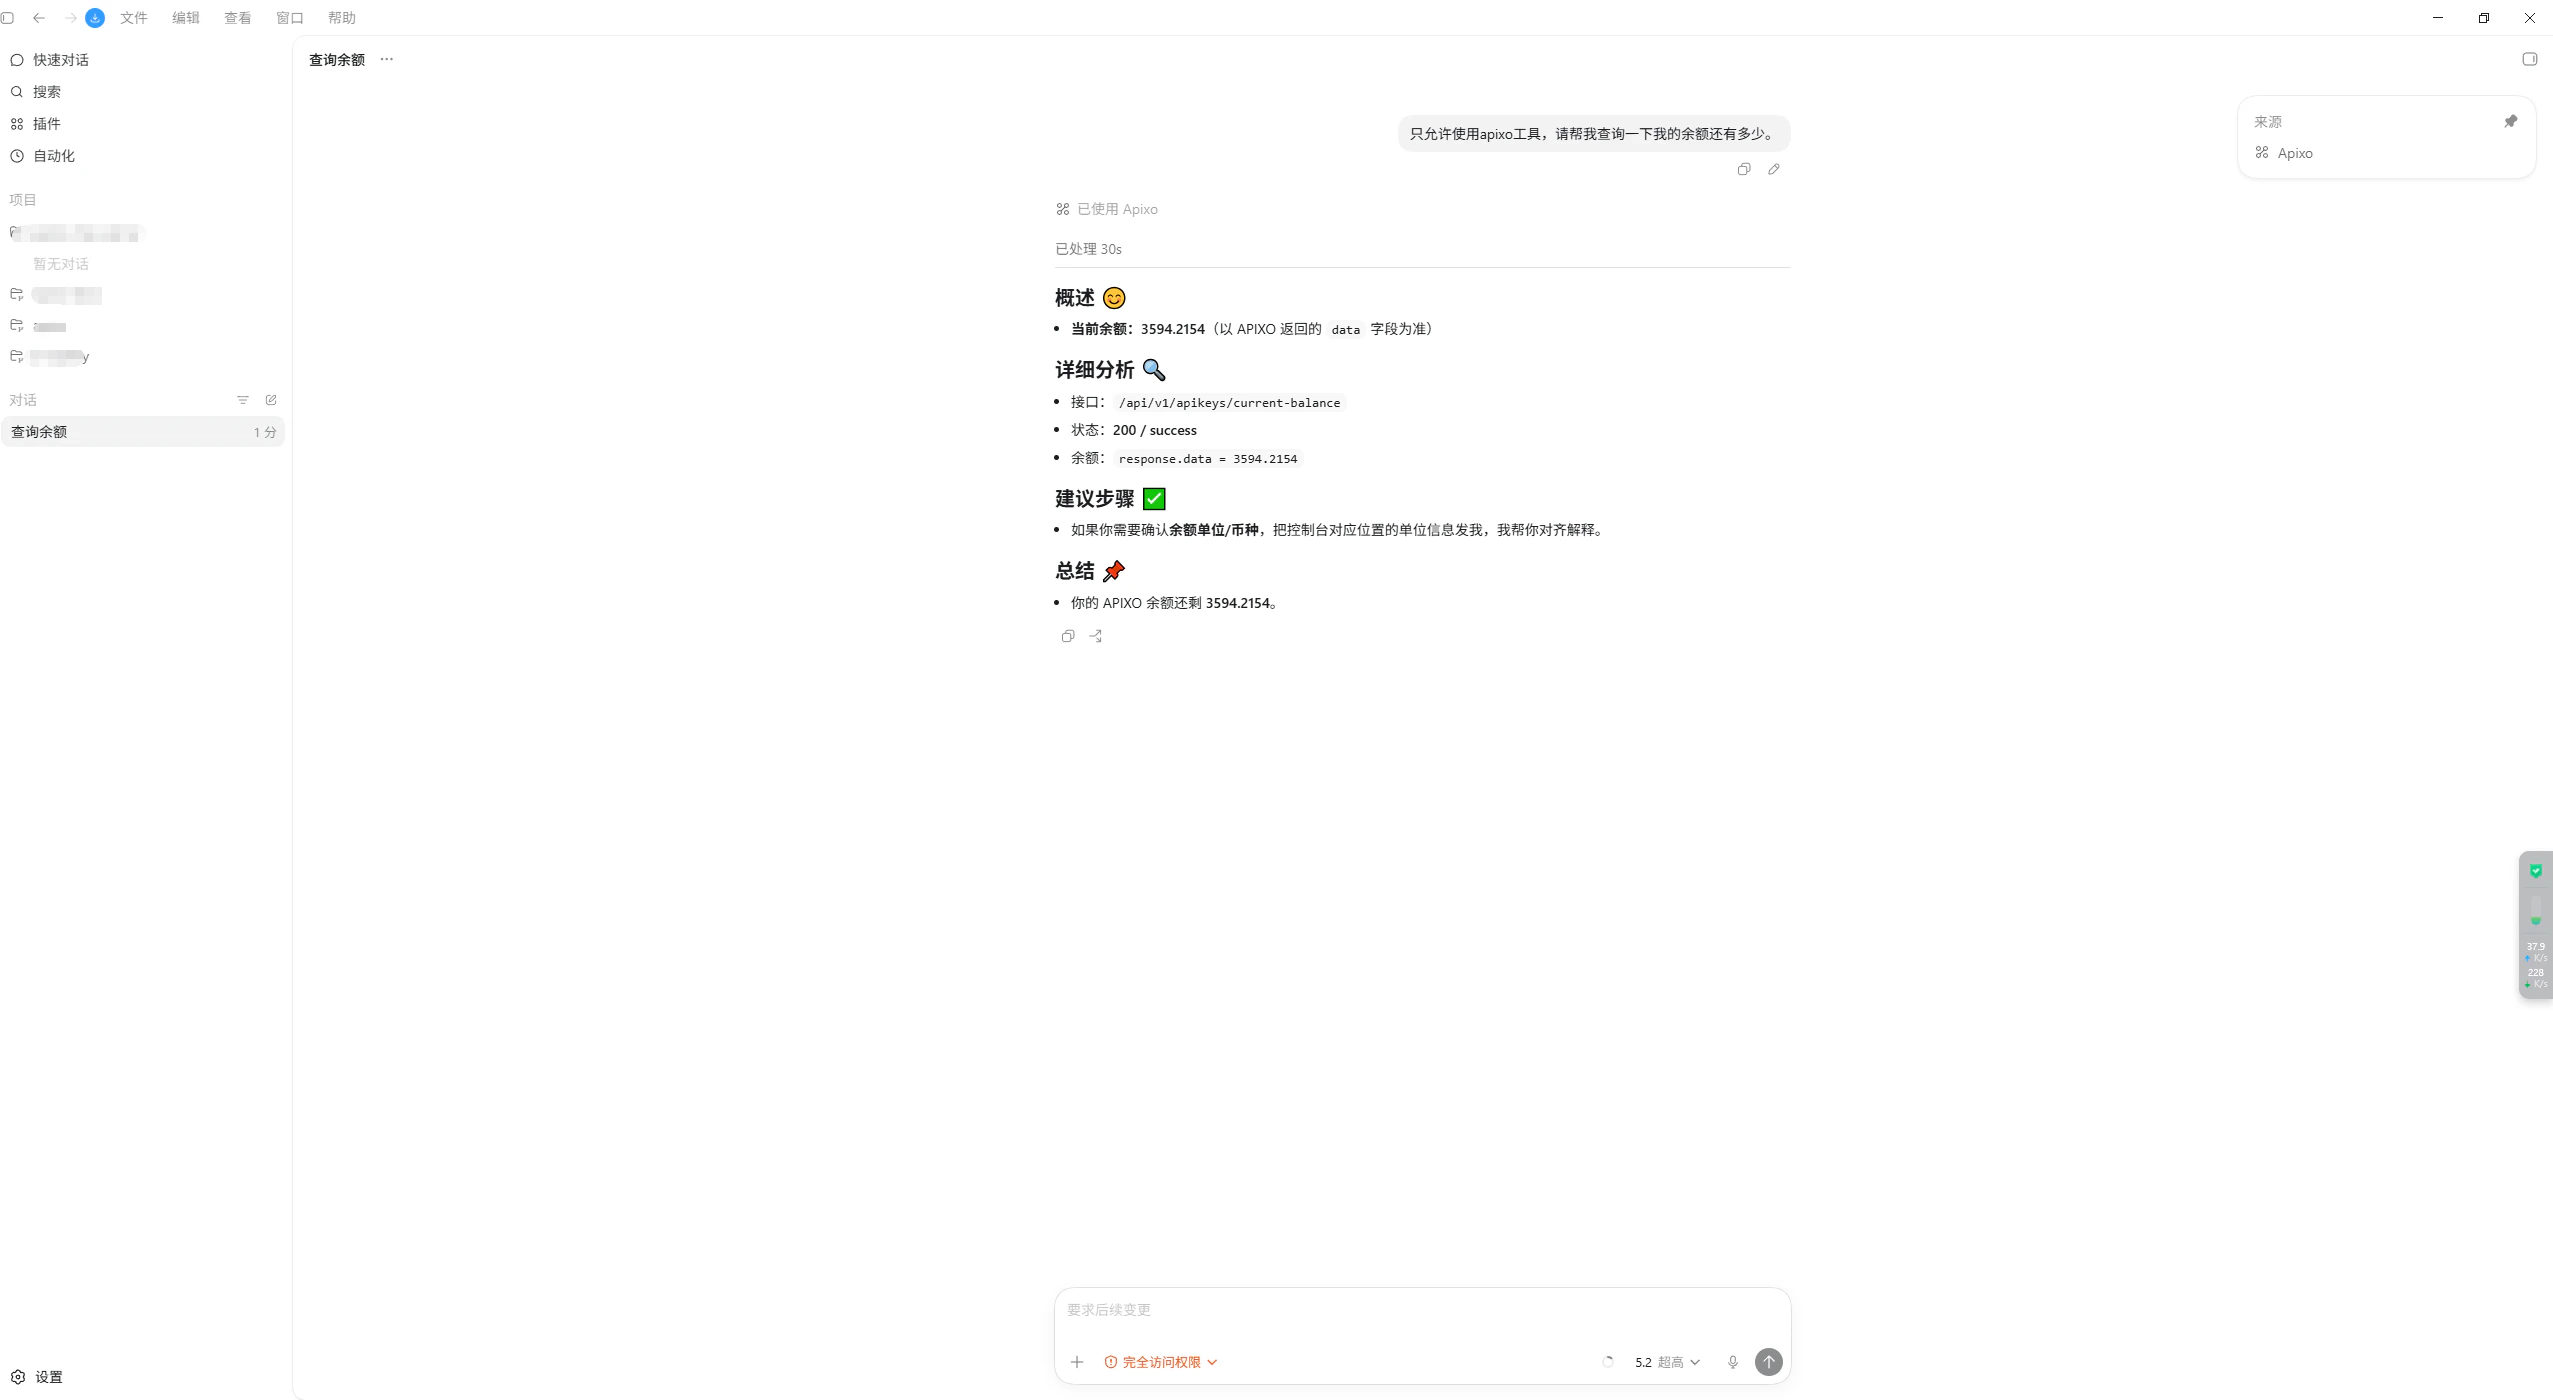
### Test 3: Check your account balance
```text theme={null}
Use only the apixo MCP tools. What is the current balance on my APIXO API key?
```
Expected: the agent calls `apixo_get_balance` and reports a numeric balance.
### Test 2: Submit a task directly from chat
Useful when you want to sanity-check a model before wiring it into code.
```text theme={null}
Use only the apixo MCP tools. Generate a 16:9 image with the nano-banana-2 model
of a serene Japanese garden at golden hour. Return the final image URL when done.
```
Expected: the agent calls `apixo_generate_task` for `nano-banana-2`, polls with `apixo_get_task_status` until the task succeeds, and prints the result URL.
### Test 3: Check your account balance
```text theme={null}
Use only the apixo MCP tools. What is the current balance on my APIXO API key?
```
Expected: the agent calls `apixo_get_balance` and reports a numeric balance.
 ## Next steps
Tool reference and capability overview.
Fix common install issues across clients and operating systems.
The endpoint the MCP server submits tasks to.
Find the model ID to pass to `apixo_generate_task`.
## Next steps
Tool reference and capability overview.
Fix common install issues across clients and operating systems.
The endpoint the MCP server submits tasks to.
Find the model ID to pass to `apixo_generate_task`.